If You Want to Be a Digital Marketer, Learn Web Development

I ended up in marketing nearly by accident. My plan was always to be a developer—it still is—but I knew I eventually wanted to start a company, and I so I knew that I would at some point need to learn a bunch of other stuff in addition to pure programming: sales, marketing, economics, accounting, business law. So when I was offered a marketing job, despite a work history full of building websites by hand and utterly lacking in anything even containing the letters “SEO”, I took it.

This gave me an interesting background for a marketer, where though I was extremely junior, I understood all the technical jargon that made my coworkers flinch. And looking back, I think my technical background was a boon to me; so much so that I recommend taking at least one beginner web development class to anyone who wants to be a digital marketer.

Why Learn Web Dev?

Knowing web development is so useful for digital marketing because the two are hopelessly intertwined. For example, take the two most important pieces of metadata for SEOs: the meta title and description tags. Knowing where they are in the code, how they show up on the SERP, and how Google indexes them is extremely helpful to use them effectively for on-page SEO. Take another example: it’s all well and good to know by rote that appropriately sized images will make your page load faster, but if you understand the reason—that CSS takes a moment to resize the image, and if you give it an appropriately-sized image, it can prepare it faster—you’ll know exactly how to fix the problem. In general, being able to read the code when you “view source” on a webpage, along with knowing the general architecture of the internet, will help you immensely.

If you’re currently working in marketing or you’re planning to start soon, you may be thinking, “okay, in theory that sounds nice, but I’m already working so hard on marketing itself, and I don’t have time to learn to code – isn’t it super time-consuming and hard?” Fortunately for you, the answer is no, it’s not harder than any other marketing skill – if you have the right resource. And I have the right resource for you right here: HTML, CSS, and JavaScript Web Publishing by Colburn, Kyrnin, and Lemay. This book taught me a majority of what I know about HTML and CSS, which says at least something given my portfolio. It has one oddity: it doesn’t tell you how to actually host your site on the web until chapter 24. You’ll want to read that chapter very early on – probably either right before or right after chapter 1. Getting used to pushing your changes live with FTP is both easy (you can teach it to a 7-year-old) and important. Besides that little quirk, this is one of the best resources I have ever found for HTML/CSS/JS, and definitely the most useful for beginners. It even has a nice section on SEO at the end!

Learn to Use Chrome’s Developer Tools

Besides building your own websites, there is a techie tool that’s also helpful if you’re going into digital marketing: Google Chrome’s Developer Tools (or “DevTools”).

You can access the Developer Tools by clicking the three dots in the top right-hand corner of the Chrome browser, then selecting “More Tools” about 3/4 of the way down the menu, then selecting “Developer Tools” from the bottom of the next menu. The developer tools are a window that pops out from the right-hand side of the screen, and they’ll let you do all sorts of awesome stuff, including seeing in real time in a real browser what would happen if you made certain edits, without ever changing the real source code. You can do this with not only your own website, but with other peoples’ sites, even those which are way more complicated than yours. Here’s a nice tutorial to get you started with Google DevTools.

These tools are very useful for the beginner web developer or digital marketer because they’ll let you toy around with massive, complex sites without having to build those sites from the ground up yourself. I tend to just open the DevTools on random websites and play around with making changes to see what they do. It’s not a systematic process, but it’ll improve your web development skills, and it’ll also be fun. Who said work couldn’t also be play?


Do you agree that digital marketers should learn to code? Do you have more useful tools for beginner web devs (those who are or aren’t marketers by trade)? Let me know in the comments!

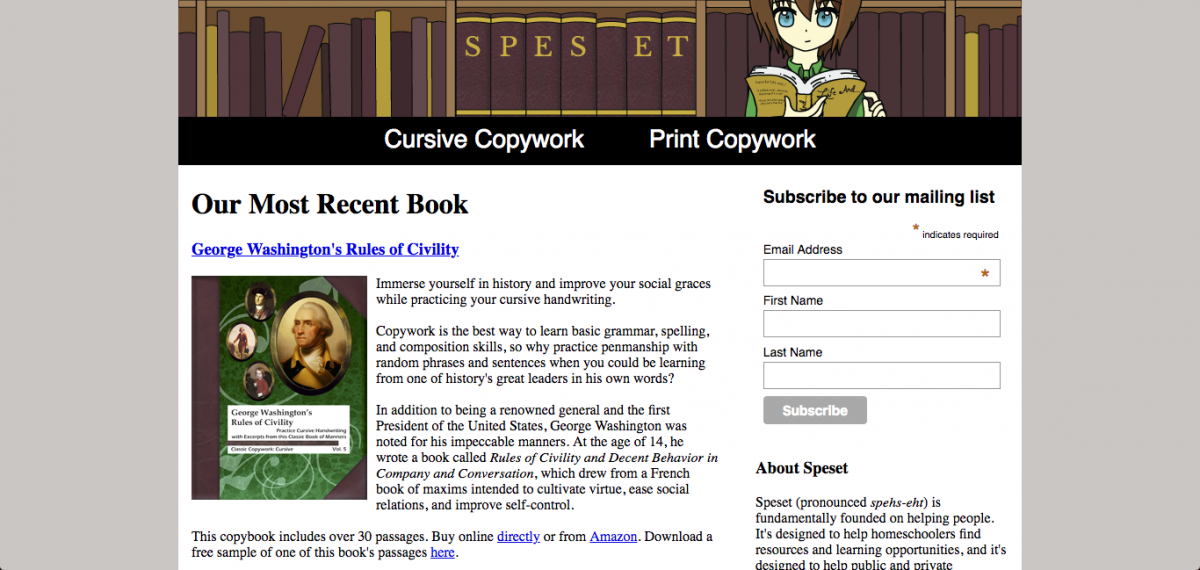
Speset.com: The Process

You know that thing you used to do as a kid in elementary school, where you learned handwriting by copying boring phrases and sentences over and over? That has a name. “Copywork.” And several years ago, my mother decided she wanted to make it interesting. How? Instead of those boring phrases and sentences, she would create copywork books with quotes from great fiction, literature, and even U.S. presidents.

Here’s the story of how I helped make that into a company.

Growing up homeschooled as the kid of an entrepreneur, I ended up using a lot of resources that were created by my mother. I took whole classes that my mom made up, start-to-finish. (These, of course, were in her areas of expertise.) One of these resources that she created early in my homeschooling life was copywork books.

If I hadn’t stood in awe behind her red patchwork recliner as she typed up a line in one of them, I would never have known that she created the books. They were professionally formatted and bound—my dad is a graphic designer, so I imagine he did that part— and there was even one of those little promotional blurbs on the back.

As we all gradually grew out of needing copywork books, she moved on to selling them to other homeschooling parents in our area. And then, one morning when I was around fifteen, she sat me down in the living room.

She talked to me about the fact that she wanted to make this into a real business, which would be able to sell not only her copywork books but also other homeschooling resources that she might come up with in the future. In order to do that, she would need two things: an online presence, and a name. Evidently, she wanted my help with those.

Having only recently started web programming, I decided to tackle the easier thing first, and I started brainstorming names. After a few minutes, I came up with the Latin half-sentence “spes et”, which means “life and”. I figured that leaving the part after “and” blank would let the reader fill in whatever they wanted. My mother and I contracted the phrase into one word, and at last, Speset was born.

Once I had a name, I got started on the graphic design. I sketched out on paper the general idea for what I wanted to do—a young person standing in front of a bookshelf with “S P E S   E T” spelled out on book spines—then imported the image to Adobe Illustrator to create the real vector. I made sure that the image was a web-worthy 960px wide and used the “save for web” function in Illustrator (back when that was a thing, it’s called “export for screens” now) to make sure that everything rasterized nicely.

One of the biggest problems I had when creating the graphics for Speset was the color scheme. My dad’s aesthetic is dark wood and leather, so he created the book covers with that in mind. Unlike a book cover, though, a website looks kind of ugly with a leather texture, so I had to find a way to convey the same idea with only flat colors. I ended up settling on a bright gold, a dark red-purple, and a light reddish-brown. I thought I might add a wood-grain texture to the background of the site, but I decided it would be too distracting and opted for a simple warm grey instead.

After the graphics were finished, I had to get started on actually coding the website. To start with, though at this point I knew almost no PHP, I used the .php file type because there was one thing I’ve always loved to do in PHP: includes. Though I knew how to import an external stylesheet or script, I didn’t know it was possible to import another HTML file. Because I wasn’t a fan of copy-pasting code over and over, or of accidentally failing to copy a closing div tag and thereby ruining everything, I loved to use PHP includes. I still do; though I now know that HTML can do includes, and though HTML5 can do forms now (I used to need PHP for that), PHP is still more powerful than HTML, so I use it to keep my doors open.

I put my nice header image into an include, made other includes for the nav bar and footer, then went about writing content. I already had the blurbs I wanted to include—they were the same ones on the backs of the books—but I needed to figure out how to format them. Given the very small amount I knew about CSS at the time, creating a two-columned list next to an image that used a specified font size and amount of space between columns was a daunting task!

After a lot of fiddling and finnicking, I’d added all our books, the final thing I needed to do was add the mailing list from Mailchimp. The code wasn’t the hard part, since they provided the form and I just had to style it; setting up the account in the first place was a little more challenging. I eventually managed, though, and I set it up to send me emails whenever I gained subscribers to the mailing list.

Over the course of the next few years, I made a handful of improvements to the website, but mostly just added new books as they were published. One thing happened that I wasn’t expecting, though. I didn’t figure it out until earlier this year, when I started cleaning out my inbox, but when I did, I realized I had a lot of emails from Mailchimp.

At that time, I hadn’t sent out a single email to any of the Speset subscribers. I hadn’t even done a single ounce of marketing. Beyond the mere existence of the website, I had done nothing at all. And yet, I kept seeing emails from Mailchimp. After a few scores of them I thought to log in to my account and check the subscriber statistics. I blinked a few times when I saw the number. Over a hundred?! Dude!!

I’ve since realized the probable reason this happened. Before I’d created the website, the books already had a niche following on homeschooling forums: my mom had done a good job at word-of-mouth marketing. But, they were all just floating about in the Amazon aether, without anything connecting any of the books to each other. Once they all had a single home, the people who’d already cared about them were able to get to them more easily, and to recommend our products more easily. The mere existence of the website promoted both brand loyalty and word-of-mouth.

Here’s the website, by the way. Thanks for reading.

Why to Use CSS Instead of JavaScript for Your Menus

Before I start on this post, if you haven’t read Good Tech Things to Know, I recommend you read that one first. I’ll be referencing what I wrote in that post for purposes of explaining the tech in this one. If you already have a basic understanding of what both JavaScript and CSS are and what they do, you’re welcome to hang out here, but the link’s still there if you need it.

That said, let’s dive into a lesson I learned very recently: why to use CSS instead of JavaScript for menus.

To start off, let’s explain what I mean by “menus”. A menu is just a place that a user can go to choose from different options; just like in a restaurant. In the context of websites and applications, menus can be used for navigation, selection, input, and more. There are a number of types of menus, but one of the most common, especially for navigation on websites, is a drop-down. Here’s an example. You can hover your mouse over the square labeled “Two” and get four additional options. Here’s another example. You can click on any of the squares with arrows and access additional options. This example is a bit more complicated, since hovering over some of the options shows yet more. Still, both are the same style of navigational menu.

The first example menu is created with CSS. The second is created with JavaScript.

It’s pretty easy to understand how you could create a menu like that with JavaScript. After all, JavaScript is a programming language, and programming languages can make decisions and do things. The decision for a drop-down menu goes something like, “if the user hovers over the square labeled ‘Two’, then display the drop-down; if the user stops hovering over any part of the menu, then stop displaying the drop-down.”

But if you recall, CSS is a markup language. It doesn’t make decisions and it doesn’t do stuff, it just styles HTML. So how exactly is it possible to make those decisions using CSS, and why am I saying it’s preferable to do so?

To answer the first question, I’m going to delve a bit more into how CSS works. Don’t worry; I’ll make it easy.

The basic structure of CSS is a bunch of commands that look like this:
property: value;
For example, take the statement “color: blue”. Color is a property which tells the computer what color a piece of text should be. It has a huge range of possible values. Blue is the specific value of the color property that we want to use in this circumstance.

A lot of the time, CSS properties don’t have such obvious names. For example, what do you think “margin: auto” does? It’s not obvious by reading the property name, so the programmer needs to know by rote. (Which this programmer does. “margin: auto” centers something.) So, the process of coding CSS is essentially translating between what you want the computer to do, and what properties you should set to what values to make that happen.

For purposes of creating drop-down menus with CSS, the single most important property is “display”, and the most important value of that property is “none”. Basically, “display: none” removes something entirely from the page. It’s like a CSS backspace key.

This “backspace key” is really useful for doing things like removing a drop-down menu from the screen when the user stops hovering over it.

So if that’s the “then” part of the statement “if the user stops hovering over any part of the menu, then stop displaying the drop-down”, how do we code the “if” part? How can we tell whether or not the user is hovering over the menu?

Fortunately for us, the part of the computer that figures out whether or not the user is hovering over the menu is not programmed in either JavaScript or CSS. It’s built into the web browser itself. So, both languages have the capability to figure that out. In JavaScript, it goes
if (!event.target.matches('.nav'))
In CSS, it goes
.nav a:not(:first-of-type) { display: none; }
Don’t worry about not understanding those code snippets, I just wanted to show them to you to demonstrate how different the same basic code looks in different languages.

So, we’ve got both pieces. We’ve got the decision, and we’ve got the action. And so, we can program drop-down menus with CSS, even though it’s not technically a programming language. Pretty cool, eh?

Now, I did previously say that not only is programming menus with CSS possible, it’s actually preferable. There’s one simple reason for this: ubiquity.

An unfortunate fact of life for web designers is that not everyone is going to be seeing your website in the same way. Their screen size could be bigger or smaller, or have different proportions. Their browser could be different from the one you use, or it could even be text-only. They may have some extensions enabled that you’ve never heard of, and they may not have extensions enabled that you use daily. And every one of these differences affects how that user will view your website. If your website isn’t usable to everyone on every device with every setting, you’ll drive away a ton of potential customers.

I bring this up because JavaScript is actually one of those potential differences between you and your users. There are a lot of people who don’t have JavaScript enabled. If you program your website’s navigation using JavaScript, your website will be completely unusable to someone who doesn’t have it enabled.

Nobody wants to disable CSS, however: while JavaScript is frequently used to make pop-ups and ads visible, and otherwise isn’t used for integral functions; disabling CSS would not prevent ads from being displayed and is one of the most integral parts of a webpage.

So, CSS is ubiquitous whereas JavaScript is not, and a crucial piece of your website should not be created with a non-ubiquitous language. That is the reason that I recently deleted all the JavaScript code I had for my website navigation and decided to start over with CSS. And that is the reason that you should program your menus with CSS instead of JavaScript.

How to Write CSS That Doesn’t Suck

A few days back, I read an article that ended up significantly improving the way I wrote CSS. Given how quickly and easily stylesheets can get horribly disorganized and out of hand, I found the tips to be immensely useful.

The article is primarily for teams of coders, who need to keep a ton of CSS organized such that many different people can understand it. Even so, I found a lot of it useful as an independent developer. Here are the things I found most useful:

  • Group related styles together. If you do absolutely nothing else this article mentions, do this. It is so helpful to scroll through a stylesheet and know that since you’ve run across your <p> tag styles, your <h1> styles have got to be around here somewhere.
  • After you’ve grouped related styles, try to arrange them by which page or set of pages they apply to. After that, create some suitably humungous, obnoxious, and obvious comment headers and make section headings, like this:
    /********************\
    ** ABOUT PAGE STYLES**
    \********************/
    This makes it infinitely easier to know which page you’re styling and also helps save your ass if you accidentally name a class or id something stupid and uninformative.
  • Make constructive use of white space. For closely-related styles, put only one blank line between styles; for more loosely-related styles, use 2 or 3. Put 4 blank lines before a new heading. This groups stuff up visually and makes it even easier to find what you’re looking for.
  • In terms of individual styles, use this standard format. It’s easy to read, it’s the near-universal standard, and more. Single-line CSS is almost never a good idea.
    .foo {
      display: block;
      background-color: green;
      color: red;
    }
  •  Indent full rule sets if they’re nested. For example, if you’re mobile enabling, indent all the styles inside the brackets after the @media tag.
  • If a style relies on another style elsewhere, or if the meaning of the styles is otherwise at all ambiguous, add a comment! CSS never has enough comments. I know it’s annoying that there’s no single-line comment, but seriously, you can afford to type that extra asterisk and slash to make your code readable.
  • Last tip: be very, very literal about your selectors, because the computer certainly will be. Do not say “header ul” when you mean “.nav”; even if you don’t have another ul in your header, this kind of selector generality is a very bad habit that can and will come back to bite you. Whenever you’re writing a selector, ask yourself: “do I want ALL x, or just some x?” If you want just some x, write a more specific selector. Even if you don’t think you’ll ever use the other types of x.

If you want more CSS tips, go on and read the full article! It’s a fun and helpful read, full of great info. Otherwise, that’s all for today: happy coding!